Most people think that becoming a professional tattoo artist means creating amazing designs every day. And while that’s an outcome of success, what people don’t see are the characteristics that allowed the artist to get to that point- the grit behind it all.
In the tattoo industry, simply being a good tattoo artist is not enough to be successful. There are other qualities aspiring tattoo artists need to reach the top.
In this article, we’ll break down:
Remember to wear latex gloves (or nitrile gloves) while setting up your tattoo machine.
How to Set Up a Coil Tattoo Machine
Coil tattoo machines are often considered “traditional” machines. They can be tricky to tune, so most artists will use two separate machines - one for lining and one for shading - to avoid re-tuning their machine mid-tattoo.
Set Up the Springs
If the springs are not already in place on your machine, you’ll need to set them up around the screw on the armature bar. Wedge the springs around the screw; the back spring goes under the front spring. Then loop the O-ring around the screw, going under the front spring and over the back spring.

Put a Slight Bend in the Tattoo Needle
There’s two reasons artists put a bend in the needle before sliding it into the tube. First, it makes it easier not to barb the needle when you slide it through the tube. Second, having a slight bend lets the needle rest against the back of the tip more easily.

Put the Needle Through the Tube
Carefully slide the needle through the tube and attach the rubber grommet. Make sure that the needle does not hit the tip on its way through, this can barb the needle. Barbed needles can mess up your lines, chew out the skin faster, and cause your client to have a painful tattoo experience.
Make sure that you have a tip with a matching needle bar. For example, a tube made for a 7 Round Liner will have a diamond tip (ideal for liners) and only be big enough for a liner with 7 sharps. It’ll be impossible to use a larger liner, a mag, etc. with that tip.
Feed the Needle and Tube Through the Clamp
Loosen the clamp at the base of the machine so the needle and tube can easily slide through. Secure the grommet at the end of the armature bar pin.
Note:
Be careful not to hit the needle as you feed it through the tube. This can result in a barred needle. A barred needle can cause a lot of trauma to human flesh and result in a bad tattoo.

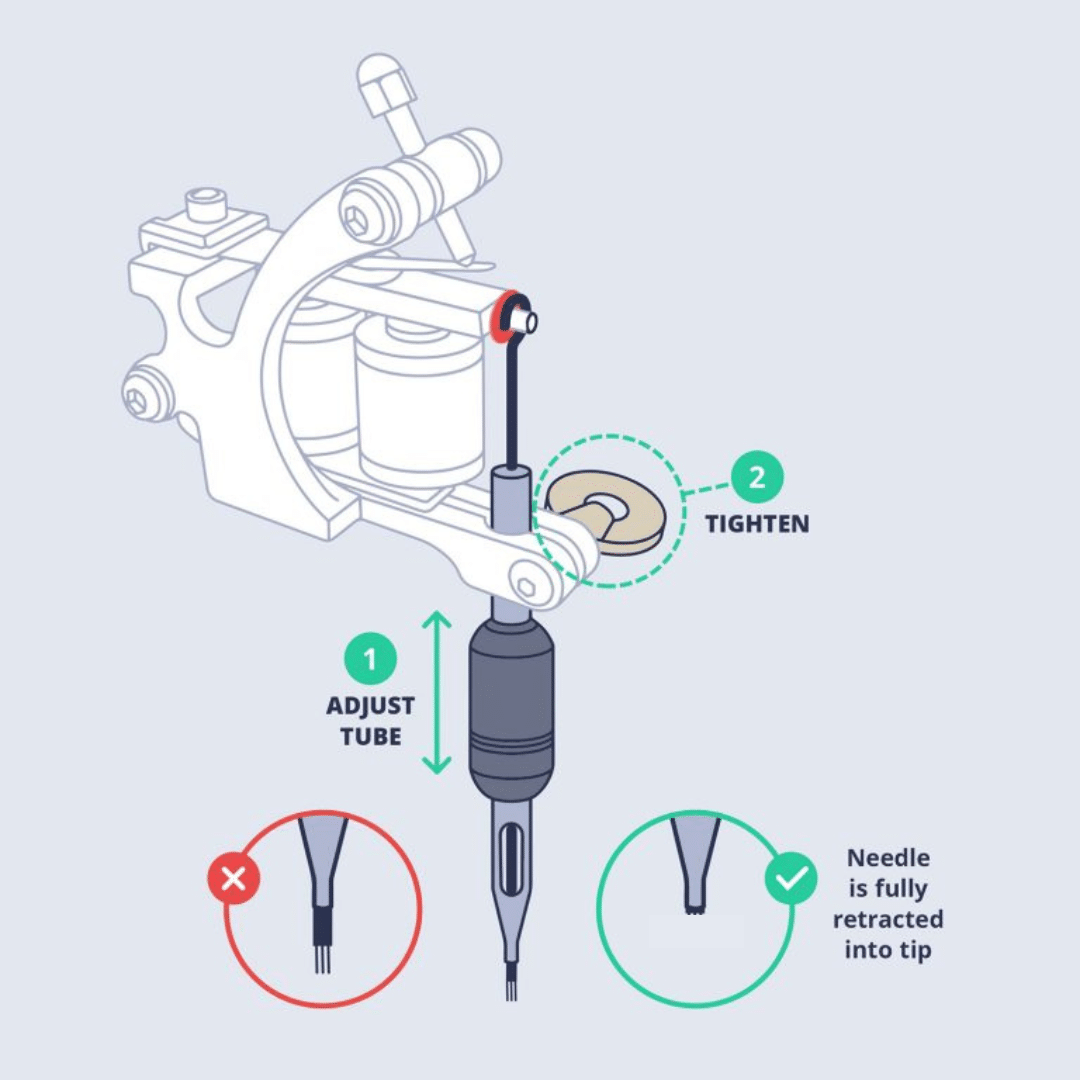
Adjust the Tube so Needle is Fully Retracted
If your needle does not go all the way back into the tip while you are tattooing, it won’t be able to pick up ink from the reservoir. Move the tube up or down inside the clamp until the end of the needle is lined up with the tip of the tube.
Put a Rubber Band Around the Tattoo Machine
Having a rubber band around the machine applies a little bit of pressure to the needle. That pressure pushes the needle to the back of the tip so it doesn’t bounce around and ruin your line work. It also keeps the grommet from popping off.
You only need one rubber band. Too much pressure on the needle will make it harder for the needle to move, which will wear out your machine and cause issues with the ink “spitting” out.

Attach Your Clip Cord
Attach your clip cord to the back of the machine. Press the foot pedal or the “on” button on your power supply to turn the machine on. The “buzz” you hear while it’s on is the armature bar hitting the coils. Make sure to put a clip cord cover over your clip cord to protect yourself and your clients from potential contact with bloodborne pathogens.

Tune Your Tattoo Machine

When tuning a coil machine, you’ll need to adjust the following settings:
The voltage is essentially how much power is going through your tattoo machine. The more voltage, the more powerful the “hit” of the needle. We recommend keeping your voltage around 4 volts for shading and around 5.5 volts for lining with a traditional coil machine.
Sometimes labeled “Hertz” on your power supply, the CPS of a machine is how many times the needle is making a full up-and-down motion per second. We recommend a CPS of 120 for shading and 130 for lining.
You increase the CPS by moving the contact screw in closer to the front spring and you decrease the CPS by moving the contact screw away from the front spring.Your machine stroke is the length of space the needle covers in one up-and-down motion. For coil machines, we recommend a 3mm stroke for lining, a 3.5mm stroke for black and gray, and a 4mm stroke for color packing.
Like the CPS, you adjust the stroke by moving the contact screw. Moving the contact screw in shortens the stroke. Moving the contact screw in also increases the CPS. This works well for lining as you need both a shorter stroke and an increased CPS. (In the same way, moving the contact screw out lengthens the stroke and decreases the CPS, which you would want for packing.)
The duty of your machine measures how long the needle is in the skin. If the duty is below 50, it means the machine is spending more time off than on during a cycle. This means the needle is spending too much time extended out into the skin, causing extra trauma to the skin.
If the duty is above 50, the needle is spending too much time in the tube and not putting enough ink in the skin.
To adjust the duty, you need to swing the armature bar out and lightly bend the back spring. Bend the back spring up if the duty is less than 50, and bend the back spring down if the duty is more than 50.
Wrap Your Tattoo Machine
Place a machine bag over your machine. We like to put a small hole in the bottom of the bag to fit the grip through. You can then use grip tape to secure the machine bag.

If you do not have an autoclave, you must use disposable grips.
How to Set Up a Rotary Tattoo Machine
Rotary tattoo machines move the tattoo needle with a direct drive motor. Because the cam wheel on the motor is powered directly and doesn’t require all the tuning of a coil machine, rotaries are much easier to set up.
Check out our instructors’ favorite rotary tattoo machine in our new article: Inkjecta Flite Nano Review.
Use an Allen Key to Attach the Needle Bar and Cam Wheel
Place the plunger bar in the opening of the cam wheel and tighten with an Allen key. Then pop the cam wheel into place and tighten with an Allen key.


Attach the Tube and Needle Cartridge
Most rotary machines will have a clamp that you twist to open. Open it enough for the tube to fit in. Guide the needle bar into the tube. Then, place the needle cartridge into the grip. You’ll feel a “click” as the cartridge locks into place.

Adjust the Depth of the Needle
Before you tighten the clamp all the way, move your needle to set the depth you want to tattoo at. We like to float the needle, which means lining the needle up with the very end of the cartridge.
If the needle is poking out the end of the cartridge while the machine is off, you’ve gone too far.

Attach the RCA Cord
To power the machine, plug the RCA cord into the machine and into the power supply.

Wrap Your Tattoo Machine
Place a machine bag over your machine. You can poke a hole in the bottom of it to fit the grip through. Secure the bag with grip tape around the grip. If you do not have an autoclave you must use a disposable grip.

Bonus Step: Changing Out The Cam Wheel on Rotary Tattoo Machines
If you want to change the machine stroke of your rotary machine, you’ll need to switch to the cam wheel with that stroke.
Use the Allen key set to release the plunger bar from the cam wheel, and then to get the cam off the machine. You can then replace it with a new cam wheel, putting the plunger bar on the new cam.
We recommend using a 4mm stroke for linework or packing color and a 3mm stroke for black and gray, realism, or smooth shading.

How to Set Up a Pen Tattoo Machine
Pen machines are simple to set up, which is why they’re some of the best tattoo machines for beginners. Many pen machines have a set stroke (usually 3.5mm) so you can line, shade, and pack color with them without having to make many adjustments to the machine.
Put Any Pieces Together
Many pen machines will come in two parts (this is often the case with wireless pen machines, and the rechargeable battery will be the upper half).


Put in the Needle Cartridge
Tattoo pens use needle cartridges. All you have to do is put the cartridge in the grip and twist to lock it in. We recommend using needles that have a membrane. This will keep blood, ink, plasma, etc. from getting back into the machine and contaminating it.
Set Your Needle Depth
Most pen machines will have you twist the grip to set the depth. We recommend manually controlling your needle depth by floating the needle. To set up your machine to float the needle, you twist the grip until the end of the needle lines up right with the bottom of the cartridge. If your machine is off and the needles are poking out past the cartridge, you’ve gone too far.
Wrap Your Machine
A lot of pen machines can be wrapped in a clip cord cover. If you do not have an autoclave, you need to buy disposable grips for your machine. Secure the machine bag with grip tape before starting.

Turn the Machine On
Most pen machines require little to no setup to get them up and running. Most wireless machines will even come in the mail already charged if you order from the manufacturer. If you have a wireless machine, there will be a power button at the top of the machine. If your machine requires an RCA cord, plug it into the power supply and your machine.


Set Your Voltage
If your pen machine has an RCA cord, you will need to adjust the voltage on your power supply. If you are using a wireless machine, you will adjust the voltage on the machine (most will have a light up display or an LED screen showing you the voltage).
Whether you choose a coil machine, rotary machine, or pen machine, make sure to get your machine from a reputable supplier. Never work with a homemade tattoo machine.
Setting Up Your Tattoo Power Supply
Your power supply connects to your tattoo machine through a clip cord (for coil machines) or RCA cord (for rotary machines). You can also use a wireless battery pack.
Power supplies vary in their design, and they can use analog or digital displays. We recommend digital displays because they are easier to adjust the voltage while you’re tattooing.
Starter Kit Power Supplies
Most starter kits will come with a power supply. However, kits usually come with low quality tattoo supplies, meaning the power supply will not be reliable during a tattoo session. A quality power supply is fairly inexpensive, and it will let your machine run at a consistent speed.
Learn to Master Tattooing

Getting comfortable with your tattoo machine is only the first step on your journey to becoming a tattoo artist. Next, you need to learn how to use it to flawlessly apply tattoos.
There’s a ton of information out there that promises to teach you to tattoo, but a lot of it is outdated or incorrect. This is why most tattoo artists trying to learn online pick up bad habits that can take years to unlearn.
If you want to learn how to tattoo the right way, you can still do it online and at your own pace.
We created the Artist Accelerator Program to give aspiring artists all the lessons and techniques they need in an easy-to-follow, 9-step roadmap that can take anyone from complete beginner to professional tattoo artist in as little as 90 days.
Inside the program, you’ll learn the skills tattoo artists use every day, get personalized guidance from professionals, and put together a portfolio that gets you hired.
Skip the years of trial and error and start building a career you love today.
Click here to check out the Artist Accelerator Program.

This is a great guide for setting up a tattoo machine! I’m going to try it out soon!
This all help me so much,i,m verry gratefull ,it,s a lot to learn but so cool,thank you ,verry verry much for all of this
I feel positive about these tips. I hope it assists me in getting started with this career, because I'm from a fine artist background. Thank you..!
I've done everything you said in the set up of my coil tattoo machine and it works fine on the practise skins but when I do myself as soon as I wipe the tattoo the ink wipes straight off. It doesn't stay in my skin and I'm definitely going deep enough because it bleeds sometimes. The ones that do stay are only very faint or a few weeks later they're gone. What am I doing wrong.
Loved your information. Well written and easy to understand, thank you.